
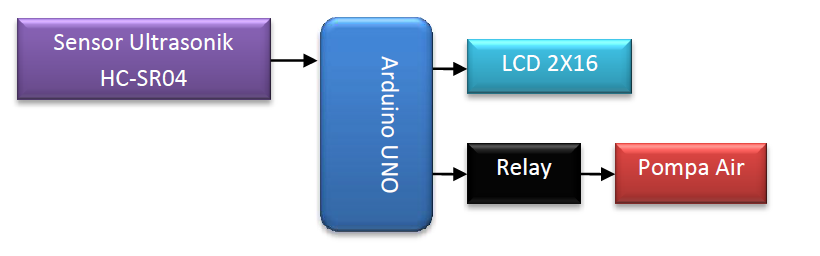
The principle of Ultrasonic sensor is based on the reflection of a sound wave. So that it can be used to interpret the existence (distance) of an object with a certain frequency. With that ability, it also can be to measure a volume tank with regard to other quantities like length, widht, and height of certain geometry shape. Like this project, Ultrasonic sensors are used to detect water levels in water tank. so if the set point that use for water level is reach, the program will turn off the Water Pump.
Hardware Requirement
- Nokia 5110 LCD
- Arduino UNO
- Power supply +5 Volt
- Jumper


Water Pump | Source
Block Diagram
Schematics

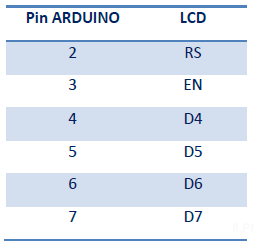
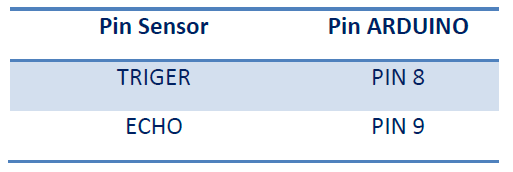
Arduino - Ultrasonic Sensor Wiring
Arduino - Relay Wiring

const int TRIGPIN = 8;
const int ECHOPIN = 9;
const int relay = 10;
#include <LiquidCrystal.h>
LiquidCrystal lcd(2,3,4,5,6,7);
unsigned int jarak, k, timer;
long T_air,La,Vol;
void setup(){
lcd.begin(16, 2);
lcd.print(" WATER LEVEL ");
lcd.setCursor(0, 1);
lcd.print(" CONTROL ");
delay(2000);
lcd.clear();
lcd.print("Volume=");
lcd.setCursor(0, 1);
lcd.print("Status=");
pinMode(ECHOPIN, INPUT);
pinMode(TRIGPIN, OUTPUT);
pinMode(relay, OUTPUT);
digitalWrite(relay, 0);
La = 2826;
}
void loop(){
digitalWrite(TRIGPIN, LOW);
delayMicroseconds(2);
digitalWrite(TRIGPIN, HIGH);
delayMicroseconds(10);
digitalWrite(TRIGPIN, LOW);
timer = pulseIn(ECHOPIN, HIGH);
jarak= timer/58;
if (jarak > 100) jarak = 100;
T_air = 100 - jarak;
Vol = La * T_air;
Vol = Vol / 1000;
lcd.setCursor(7,0);
lcd.print(Vol);
lcd.print(" ");
//------ control pompa
if (Vol < 100){
lcd.setCursor(7,1);
lcd.print("Pompa ON ");
digitalWrite(relay,1);
}
else if (Vol > 250){
lcd.setCursor(7,1);
lcd.print("Pompa OFF");
digitalWrite(relay,0);
}
delay(500);
}
How it Works
1. Connect the Arduino with Peripherals needed
2. Plug in the Power Source on the device
3. Compile and upload the script program above to your arduino
4. Connect the water pump with the relay. Relay functions as a switch, disconnects and connects the2. Plug in the Power Source on the device
3. Compile and upload the script program above to your arduino
electric current at the water pump. Connect as image below :

5. Prepare a tank that we will fill, tank height = 100 cm, diameter 60 cm

you use.
6. Take place the ultrasonic sensor in the upper tank facing down and Install the water pump.
7. Plug the power supply and turn it on, so LED indicator light is on, LCD is also on.
8. First view on the LCD after 2 seconds

9. The next display will shown the tank volume and pump status

*Pompa = pump (Bahasa Indonesia)
10. if the tank volume is less than 100 liters then the pump is ON.
If the tank volume is mroe than 250 liters then the pump is OFF.
Video for Project III - 2. Water Tank Volume Control (Arduino Based)
Download required file
10. if the tank volume is less than 100 liters then the pump is ON.
If the tank volume is mroe than 250 liters then the pump is OFF.
Video for Project III - 2. Water Tank Volume Control (Arduino Based)
Download required file
No comments:
Post a Comment