
Arduino will read the temperature of the room with 2 temperature sensor type DS1820 / 22 and LM35. For sensors DS1820 used is a waterproof type or waterproof, so that on the final result will be seen whether the resulting data is relevant or not. The readings of the two sensors are shown to the 2x16 LCD.
Hardware Requirement
- Arduino Uno Board
- DS1820/1822 Temperature Sensor (Waterproof)
- LM35 Temperature Sensor
- LCD 16*2
- Power supply +5 Volt
- Jumper

Sensor Suhu DS1820 Waterproof | Source
Block Diagram

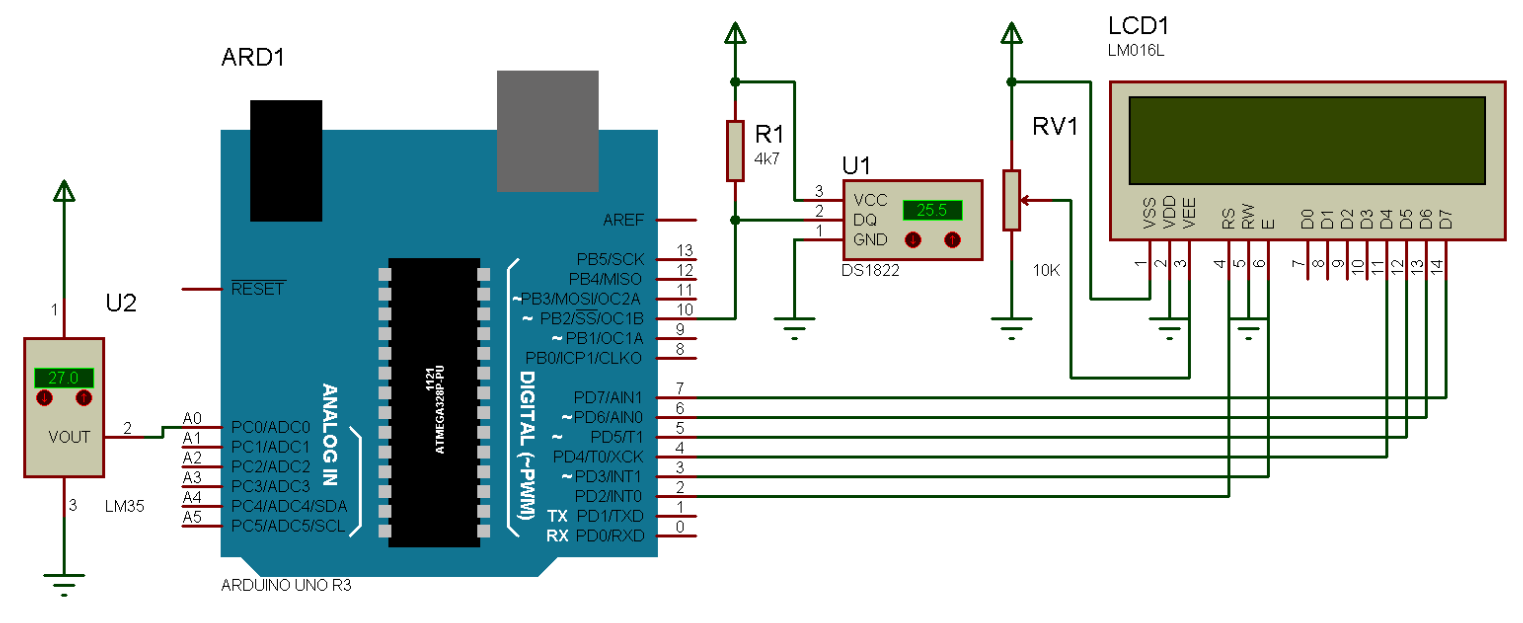
Schematic
Arduino - LCD Wiring

Arduino - LM35 Wiring

Arduno - DS1820 Wiring

Source Code/Sketch
#include <OneWire.h>
#include <Wire.h>
#include <LiquidCrystal.h>
LiquidCrystal lcd(2, 3, 4, 5, 6, 7);
OneWire ds(10); // on pin 8 --DS1820
unsigned int adc,tempDS,tempLM;
//============================================
void setup(void) {
lcd.begin(16, 2);
lcd.print("2Ch Sensor Suhu");
lcd.setCursor(0,1);
delay(1000);
}
//===========================================
void loop(void) {
byte i;
byte present = 0;
byte type_s;
byte data[12];
byte addr[8];
float celsius, fahrenheit;
//===================================
if ( !ds.search(addr)) {
ds.reset_search();
delay(250);
return;
}
// the first ROM byte indicates which chip
switch (addr[0]) {
case 0x10: // Chip = DS18S20 or old DS1820
type_s = 1;
break;
case 0x28: // Chip = DS18B20
type_s = 0;
break;
case 0x22: // Chip = DS1822
type_s = 0;
break;
default: //Device is not a DS18x20 family device.
return;
}
ds.reset();
ds.select(addr);
ds.write(0x44, 1); // start conversion, with parasite power on at the end
delay(1000); // maybe 750ms is enough, maybe not
// we might do a ds.depower() here, but the reset will take care of it.
present = ds.reset();
ds.select(addr);
ds.write(0xBE); // Read Scratchpad
for ( i = 0; i < 9; i++) { // we need 9 bytes
data[i] = ds.read();
}
int16_t raw = (data[1] << 8) | data[0];
if (type_s) {
raw = raw << 3; // 9 bit resolution default
if (data[7] == 0x10) {
raw = (raw & 0xFFF0) + 12 - data[6];
}
}
else {
byte cfg = (data[4] & 0x60);
if (cfg == 0x00) raw = raw & ~7; // 9 bit resolution, 93.75 ms
else if (cfg == 0x20) raw = raw & ~3; // 10 bit res, 187.5 ms
else if (cfg == 0x40) raw = raw & ~1; // 11 bit res, 375 ms
}
celsius = (float)raw / 16.0;
fahrenheit = celsius * 1.8 + 32.0;
tempDS=celsius;
//====================
adc = analogRead(0);
tempLM=(adc*5)/10;
lcd.setCursor(0,1);
lcd.print("T1:");
lcd.print(tempDS);
lcd.write(0xDF);
lcd.print("C, T2:");
lcd.print(tempLM);
lcd.write(0xDF);
lcd.print("C");
}
How it Works
1. Connect the Arduino with Peripherals needed.
2. Plug in the Power Source on the device.
3. Add some library if needed
4. Compile and upload the script program above to your arduino.5. On the LCD will show the temperature value read by Arduino with temperature sensor DS1820
and LM35. T1 is the result of reading DS1820, T2 is the result of reading LM35.
Video for Project II -Temperature Monitoring with LM35 and DS1820 based On Arduino
Required File

No comments:
Post a Comment