
Arduino UNO is used to read the existence of a vibration with vibration sensor, the sensor already exists on vibration sensor module with sensor output in the form of digital data (DO) HIGH / LOW. The result is displayed on the LCD, the data displayed is the number of vibrations each 5 seconds. After five seconds then either the timer or the calculation will restart and return to 0 again and so on.
Block Diagram

Schematic
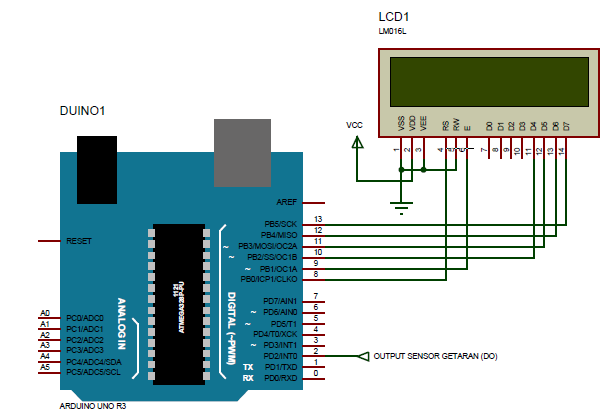
Arduino - LCD Wiring

Arduino - Vibration Sensor Wiring

Source Code/Sketch
#include <LiquidCrystal.h>
LiquidCrystal lcd(8, 9, 10, 11, 12, 13);
word vib;
void setup(){
pinMode(2, INPUT);
digitalWrite(2, HIGH);
lcd.begin(16, 2);
lcd.print(" Interface");
lcd.setCursor(0, 1);
lcd.print("Vibration Sensor");
delay(2000);
// aktivasi interupsi eksternal 0
//jika ada interupsi program menuju subrutin vibration
//interupsi dikerjakan saat pin int0 (pin 2) dlm kondisi FALLING
attachInterrupt(0, vibration, FALLING);
}
void loop(){
vib = 0;
lcd.clear();
lcd.print("Jumlah Getaran");
lcd.setCursor(0, 1);
lcd.print("/5detik:");
lcd.setCursor(8,1);
lcd.print(vib);
lcd.print(" ");
//tunda 5 detik
for(int i=1; i<6; i++){
lcd.setCursor(15,1);
lcd.print(i);
delay(1000);
}
}
void vibration(){
vib++;
lcd.setCursor(8,1);
lcd.print(vib);
lcd.print(" ");
}
How it Works
1. Connect the Arduino with Peripherals needed.
2. Plug in the Power Source on the device.
3. Add some library if needed
4. Compile and upload the script program above to your arduino.5. First initial LCD display.

will restart each 5 seconds

Video for Project II - 23. Arduino Interface with Vibration Sensor
Required file

No comments:
Post a Comment