
The principle of the soil moisture sensor is to provide the output value of the amount of electricity as a result of the water that lies between the capacitor plate of the sensor. Electric magnitude is an analog data which will then be processed by Arduino or it's called as ADC value. The value then be displayed on an LCD.
Hardware Requirement
- Soil Moisture Sensor (With any of type)
- Arduino UNO
- LCD 2x16 Module
- Power supply +5 Volt

Soil Moisture Sensor | Source
Block Diagram

Schematic

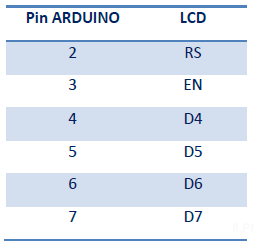
Arduino - LCD Wiring
Arduino - Soil Moisture Sensor Wiring

Source Code/Sketch
#include <LiquidCrystal_I2C.h>
LiquidCrystal_I2C lcd(0x27, 20, 4);
int sensorPin = A0; // pin sensor
int powerPin = 6; // untuk pengganti VCC
void setup() {
// jadikan pin power sebagai output
pinMode(powerPin, OUTPUT);
// default bernilai LOW
digitalWrite(powerPin, LOW);
// mulai komunikasi serial
Serial.begin(9600);
lcd.begin();
lcd.backlight();
}
void loop() {
lcd.setCursor(0, 0);
lcd.print("Tingkat Kelembapan");
lcd.setCursor(0, 1);
lcd.print("Tanah : ");
lcd.setCursor(9, 1);
lcd.print(bacaSensor());
delay(500);
}
int bacaSensor() {
// hidupkan power
digitalWrite(powerPin, HIGH);
delay(500);
// baca nilai analog dari sensor
int nilaiSensor = analogRead(sensorPin);
digitalWrite(powerPin, LOW);
// makin lembab maka makin tinggi nilai outputnya
return 1023 - nilaiSensor;
}
How it Works
1. Connect the Arduino with Peripherals needed
2. Plug in the Power Source on the device
3. Compile and upload the script program above to your arduino
2. Plug in the Power Source on the device
3. Compile and upload the script program above to your arduino
4. The LCD will display the ADC data that has been converted to soil moisture level
Video for Project II - 21. Interfacing Arduino with Soil Humidity Sensor
Download the required file.
No comments:
Post a Comment