
This project will show readings of a person's fingerprint sensor that has been registered and stored with a certain ID number. So when the fingerprint of the person is placed on the fingerprint sensor then the lcd will display the ID number that has been stored.
Hardware Requirement
- Arduino Uno Board
- Fingerprint Sensor (Unknown Type)
- LCD 16*2
- Power supply +5 Volt
- Jumper

Schematic

Arduino - Fingerprint Sensor Wiring

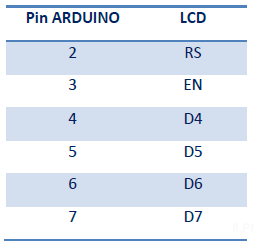
Arduino - LCD Wiring
Source Code/Sketch
#include <Adafruit_Fingerprint.h>
#include <SoftwareSerial.h>
#include <LiquidCrystal.h>
LiquidCrystal lcd(8, 9, 10, 11, 12, 13);
int getFingerprintIDez();
// pin #2 is IN from sensor (GREEN wire)
// pin #3 is OUT from arduino (WHITE wire)
SoftwareSerial mySerial(2, 3);
Adafruit_Fingerprint finger = Adafruit_Fingerprint(&mySerial);
void setup()
{
lcd.begin(16, 2);
lcd.clear();
lcd.print("Baca ID");
lcd.setCursor(0,1);
lcd.print("Sidik Jari");
delay(2000);
finger.begin(57600);
lcd.clear();
lcd.print("Test Koneksi");
lcd.setCursor(0, 1);
if (finger.verifyPassword()) {
lcd.print("OK !");
} else {
lcd.print("ERROR !");
while (1);
}
delay(2000);
}
void loop() // run over and over again
{
lcd.setCursor(0,0);
lcd.print(" Letakkan Jari ");
lcd.setCursor(0,1);
lcd.print(" Anda! ");
getFingerprintID();
delay(50); //don't ned to run this at full speed.
}
uint8_t getFingerprintID() {
uint8_t p = finger.getImage();
if (p != FINGERPRINT_OK)return p;
lcd.clear();
lcd.print("Lepaskan Jari ");
delay(1000);
//==============convert image
p = finger.image2Tz();
//------------ OK converted!
p = finger.fingerFastSearch();
if (p == FINGERPRINT_NOTFOUND) {
lcd.setCursor(0, 1);
lcd.print("Jari tdk Cocok!");
delay(2000);
return p;
}
// found a match!
lcd.setCursor(0, 1);
lcd.print("No ID:"); lcd.print(finger.fingerID);
lcd.print(" Cocok! ");
delay(2000);
}
How it Works
1. Connect the Arduino with Peripherals needed
2. Plug in the Power Source on the device
3. Compile and upload the script program above to your arduino
4. Before use this, you must register some fingerprints on fingerprint sensor using enroll program
(Previous Project)
5. First initial LCD display

Read ID
Fingerprint
6. Connection test between Fingerprint sensor and Arduino

Connection Test
OK !
7. Put the fingerprint on the sensor

Put your fingerprint
8. Release it.

Release the finger
9. if it is registered, LCD will display correct data or id

ID Number : 3
equal
Video for Project V - 36. Read Fingerprint Sensor Data with LCD View (Arduino Based)
Required File

No comments:
Post a Comment