Arduino send "text" data to the Matrix P10 Module and the text will be shown from right - to - left.
Hardware Requirement
- LED Matrix P10 Module
- Arduino UNO
- Power supply +5 Volt
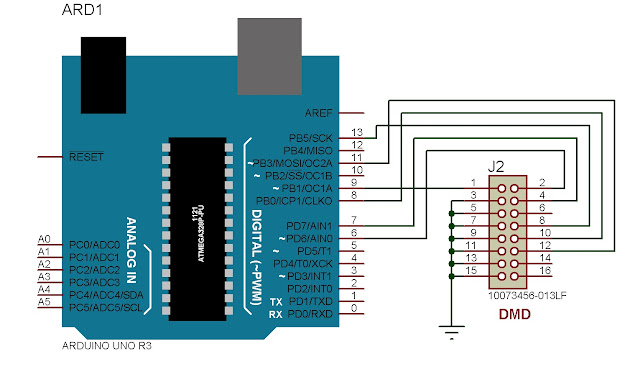
Arduino - P10 Matrix Module Wiring
Source Code/Sketch
#include <Arial14.h>
#include <Arial_black_16.h>
#include <Arial_Black_16_ISO_8859_1.h>
#include <DMD.h>
#include <SystemFont5x7.h>
#include <SPI.h>
#include "TimerOne.h"
#define DISPLAYS_ACROSS 1
#define DISPLAYS_DOWN 1
DMD dmd( DISPLAYS_ACROSS , DISPLAYS_DOWN );
void ScanDMD() {
dmd.scanDisplayBySPI();
}
void setup() {
Timer1.initialize( 2000 );
Timer1.attachInterrupt( ScanDMD );
dmd.clearScreen( true );
}
String textToScroll="99+ Proyek ARDUINO inkubatek";
void drawText( String dispString ) {
dmd.clearScreen( true );
dmd.selectFont( Arial_Black_16 );
char newString[256];
int sLength = dispString.length();
dispString.toCharArray( newString, sLength+1 );
dmd.drawMarquee( newString , sLength , ( 32*DISPLAYS_ACROSS )-1 ,0);
long start=millis();
long timer=start;
long timer2=start;
boolean ret=false;
while( !ret ) {
if ( ( timer+40 ) < millis() ) {
ret=dmd.stepMarquee( -1 , 0 );
timer=millis();
}
}
}
void loop() {
drawText(textToScroll);
}
Video for Project I - 20. Running Text using LCD Matrix P10 Module (Arduino Uno Based)
Download the required file.


No comments:
Post a Comment